Archive for the ‘Code and Development’ Category
March 10th, 2018
Well… I didn’t, not down to bit level. But I got closer than any time before as every business case was tested.
Don’t believe my rudimentary text below will simply answer how to do it; it will just give a raw landscape. It took me several nights and 3 iterations before I solved all the tidbits.
More important than to test that every Role could get to its authorised Product was to see that it could not get to unauthorised ditto.
So I had to test every combination.
Testing every permutation of User, Role and Product was not feasible. Each entity has several properties and they are, mostly, not related to authorisation. Then we have 2^64 kinds of userId where most of them are not interesting and not even in use. To continue a test on “Role of type X or Y” is really a “Role is HiredInProductsCompany”.
So I sat down and extracted the if statements from the code. They were like “if loggedOn” and “if in Role x or y”. Every such statement was extracted as a method and moved into a (temporary) helper lib.
When I was sure, with visual inspection, I had caught everything, I put some business logic into thought and manipulated and rearranged the methods. They became fewer and matchable to business requirements. Gone was “if user.Role == Administrator and user.Company = product.Company” but instead “if user.IsAdministratorAtProductsCompany(product)”.
Note that during this process I have not changed any logic and, testing besides, present state could be shipped all the time.
Now I had to get rid of any technical remains. On the outside it looked ok as the method names where very descriptive in business lingua but inside the authorisation method was “if user.Id == 0” or “if challengedUser.Id == persistedUser.ID”. It was not usable since Id as integer is a technical (often a persistance layer construction) solution for recognising an entity. In business terms it is more like “user.IsPersisted” and “if challengedUser.SameAs(persistedUser)”. I continued redusing the problem space to what I really wanted to test when authorising.
This way I seriously minimised the permutations, as an authorisable User did not care about “Id” or “Name” or “BusinessPartner” but only “IsLoggedOn” and “Role”. With 6 roles that means 12 permutations. With Project I came to, say, 32 permutations and user 4. This gives in all 12*32*4=1500 variants. Not a problem to test every combination now if I just put some (business) intelligence into creating the tests. #win
Let’s say 240 of them were positive (autorised) and the rest negative.
I started with creating a simple lib for permutating every possible input and them through One Test to green light “not authorised”. Everything red should be authorised. Already here I might have found combinations that was authorised when they should not have been.
Then I, manually, created a list of every permutation allowing authorisation. Well… manually for a programmer is reducing to loops and ifs so one method could create every authorised combination of type A and one of type B. Alltogether that is, say, 10 different methods and some manual ones. They were concatenated to a list and I made the Test assert authorised and not-authorised according to this list.
So now I had a test for every kind of authorisation check testing both authorised and not authorised and tests looks like business logic.
August 31st, 2017
If you try to run a stand alone / self contained Dotnet core 2 solution you might run into something like:
C:\MyApp\bin\Release\netcoreapp2.0\win10-x64>TestRunCore2.exe
Error:
 An assembly specified in the application dependencies manifest (TestRunCore2.d
eps.json) was not found:
 package: 'runtime.win-x64.Microsoft.NETCore.App', version: '2.0.0'
 path: 'runtimes/win-x64/lib/netcoreapp2.0/Microsoft.CSharp.dll'
It might be because you haven’t published properly to get all the dotnet files.
Or, as in my case, I was standing in the […\win10-x64] folder and not in the [..\win10-x64\publish] folder.
I thought that by standing the [\win10-x64] folder, where my [TestRunCore2.exe] file was, dotnet would reach into the [publish] folder.
I then noticed that the [publish] folder contains both my exe and the dotnetcore files.
August 14th, 2017
I tried this on OSX. It probably works on Windows too.
In this article we create a container with mongodb and some contents and then connect to it from another container.
Just for personal reasons the client container is really a “aspnet container” and not connected to mongodb to start with.
Even though I liked typing my way around Docker I tried and discovered the free Kitematic by Docker.
It gives me a very simple overview but I hope it to evolve some in the future to include a little more, like the git-githubdesktop-sourcetree journey.
Create a mongo database with contents
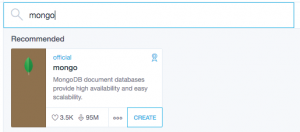
Open Kitematic and create a mongodb container.
Select Exec to get a terminal.
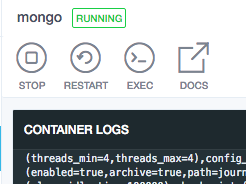
Now, inside the container, connect to the built-in mongo:
mongo
Just for fun, see what databases we have:
show dbs
Create two new records.
db.runCommand({insert:"projects", documents:[{_id:1, name:"Alpha"}] })
db.runCommand({insert:"projects", documents:[{_id:2, name:"Beta"}] })
The result should be
{ "n" : 1, "ok" : 1 }
for each call where “n” denotes the number of records inserted and “ok” the success.
See what we have of databases again, to find the new database “projects”.
show dbs
Step into the database: (Is this really necessary?)
use projects
Query what we have:
db.runCommand({find:"projects"})
Now we have a container running mongodb with data in it.
You can leave mongodb and the container but make sure it is not stopped.
Create another container
Containerising is about selecting an image and then adapting it to you needs.
I use a lot of dotnet and hence choose to select a dotnet core image.
Search in Kitematic for “aspnetcore” and select one. Which to chose can be complex; by the time of writing there are 2 from Microsoft. Which to choose is another subject and also subject to change.
When the container is started update it and then install mongodb.
apt-get update
apt-get install mongodb
Note: Updating the container with apt-get is something one probably don’t do as such tasks should be scripted. But here we are experimenting.
We don’t want the database in this container, only the client, but is easier to find an apt-get for the whole database than for just a client.
We now have 2 running containers and if you didn’t fiddle around too much they are sharing network.
The network can be inspected:
docker network inspect bridge
which results in something like:
        "Containers": {
             "2fae...eb2a": {
                 "Name": "aspnetcore",
                 ...
                 "IPv4Address": "172.17.0.3/16",
                 ...
 },
             "f565...3856": {
                 "Name": "mongo",
                 ...
                 "IPv4Address": "172.17.0.2/16",
                 ...
 }
There we have the IP addresses. Out of the box Docker containers don’t have a name resolution so we’ll use the IP address to connect.
So connect with:
mongo 172.17.0.2
and query as before:
db.runCommand({find:"projects"})
Yay!
Two connected containers, one running a mongo database and one connected to it and prepared for aspnetcore love.
August 14th, 2017
I thought of calling this article The value of tools.
I started with git at the command prompt. The threshold was high. Not only was the way of treating my precious source code files new but I also had to learn new commands and how to parse the returned text.
Then came what is now called Github desktop. It made simple tasks even simpler. It couldn’t do any hard tasks but I was perfectly comfortable with this since 99% of my tasks are simple. It is just when I mess up Git I need more horse power.
So came Source tree which made harder tasks easier. Not Easy since one has to be concentrated; and Source tree has a number a bugs and caveats that makes it not as simple to use as Github desktop.
A client that is very good for what it is good at might suffice.
To build a graphical tool for Git that is both easy to use for less knowledgable people and complete for an advanced Git user is hard, even impossible.
Alas: The solution to build a simple tool for simple tasks and an advanced tool for advanced tasks is a good idea.
August 13th, 2017
List images
docker images
Start a container and a terminal
docker run -ti --rm microsoft/aspnetcore
–rm is used to have docker remove the container when it is stopped.
Start a container and map a folder
docker run -ti --rm -v '/my/rooted/host/folder':'/MyRootedContainerFolder' microsoft/aspnetcore
Start a container, open a network hole, map a folder and start a process (a web server in this case)
docker run -p80:80 -ti --rm -v '/MyRootedFolder/WebApplication1/bin/Debug/netcoreapp1.1/publish':'/Web' microsoft/aspnetcore /bin/bash -c 'cd /Web; dotnet WebApplication1.dll'
Connect to a running container
See more att https://stackoverflow.com/a/30173220/521554
To list the active processes:
docker ps
Then attach through:
docker exec -it <mycontainer> bash
List also not running containers
docker ps -a
Remove old containers
Find the old containers
docker ps -a
Remove chosen
docker rm <container id>
There is no risk in removing running containers with above command.
See the IP addresses used by the containers
docker network inspect bridge
August 12th, 2017
I happen to have OSX as host and Win10 as virtual machine.
I have also mapped a folder so it is reachable from both OSX and Windows.
OSX has Docker installed.
Create the project in Windows/Visual studio 2017
Create a blank solution somewhere both Windows and OSX can reach. In this article I chose
\\mac\home\documents\PROJEKT
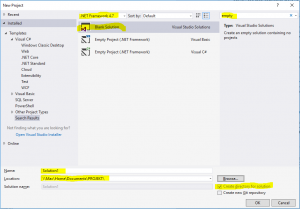
Whatever dotnet version is visible at the top of the dialogue is not of interesting as we are creating a solution file and not much more and then we add Dotnet core specific stuff. You can search for the template through “empty” or “blank”.
Add an Aspnet core application project. Keep the standard name of simplicity. The path is in the solution \\Mac\Home\Documents\PROJEKT\Solution1
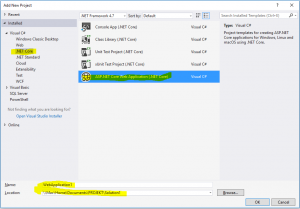
Dotnet version is still not necessary as it refers to Dotnet framework and we are caring about Dotnet core.
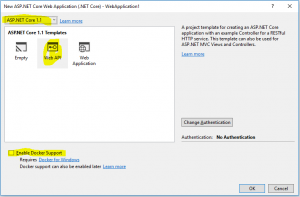
Select Dotnet core 1.1. This text is written in August 2017 and Dotnet core 2 is due November. Select WebApi. Do not add docker support. It would probably not make any change but in this exercise we are targeting running the container in OSX. If you change your mind and do want Docker-for-windows support you can always do that later with the click of a button.
When the project is added compile and run to see that all cog wheels are in place and in working order.
Tip from the trenches: Ctrl-F5 compiles, starts the web server and pop ups a web browser in one click, without having to start the debugger.
Note the URL. It is something like http://localhost:2058/api/values where /api/values is something to briefly remember. See that in the browser window there is the text [“value1″,”value2”]. It is created through the Get method in class Controllers/ValuesController.cs the “normal MVC way”.
Publish in Windows
If you right click the project (=activate the context menu in the solution explorer pane on the WebApplication1 project) there is a choice “Publish…”. AFAIK it is used for Windows or Dotnet framework stuff so leave it be.
Instead we use the CLI for restoring, publishing and activating.
If you open the console in windows you cannot use the UNC path we have put the project in. So instead use pushd like so:
> pushd \\Mac\Home\Documents\PROJEKT\Solution1\WebApplication1
Then restore the files with dotnet restore. Restoring in this case means pulling in all dependencies so we have everything we need.
It will look someting like:
> dotnet restore
Restoring packages for V:\Documents\PROJEKT\Solution1\WebApplication1\WebApplication1.csproj…
Generating MSBuild file V:\Documents\PROJEKT\Solution1\WebApplication1\obj\WebApplication1.csproj.nuget.g.props.
Writing lock file to disk. Path: V:\Documents\PROJEKT\Solution1\WebApplication1\obj\project.assets.json
Restore completed in 1,58 sec for V:\Documents\PROJEKT\Solution1\WebApplication1\WebApplication1.csproj.
Restore completed in 1,81 sec for V:\Documents\PROJEKT\Solution1\WebApplication1\WebApplication1.csproj.
NuGet Config files used:
C:\Users\username\AppData\Roaming\NuGet\NuGet.Config
C:\Program Files (x86)\NuGet\Config\Microsoft.VisualStudio.Offline.config
Feeds used:
https://api.nuget.org/v3/index.json
C:\Program Files (x86)\Microsoft SDKs\NuGetPackages\
Now publish with publish:
> dotnet publish
Microsoft (R) Build Engine version 15.1.1012.6693
Copyright (C) Microsoft Corporation. All rights reserved.
WebApplication1 -> V:\Documents\PROJEKT\Solution1\WebApplication1\bin\Debug\netcoreapp1.1\WebApplication1.dll
As we didn’t specify an output path we get the result in bin\Debug\netcoreapp1.1\.
> dotnet run
Hosting environment: Production
Content root path: V:\Documents\PROJEKT\Solution1\WebApplication1
Now listening on: http://localhost:5000
Application started. Press Ctrl+C to shut down.
Note the back slashes and that I never said to change OS. We have just started the web server in Windows.
Check it by opening a web browser and go to http://localhost:5000/api/values
You should have [“value1″,”value2”] as output. Nothing surprising.
Shut down the application (ctrl-c in the console) and refresh the browser to verify that we really are surfing to our site and not Visual studio and IIS(express).
If you want to go spelunking in the container try opening a terminal directly or connecting one.
OSX
Open an OSX terminal at your web project, where WebApplication1.csproj is. Typically something like
/Users/username/Documents/PROJEKT/Solution1/WebApplication1
If you do a dotnet run now you get an error.
> dotnet run
/usr/local/share/dotnet/sdk/1.0.1/Sdks/Microsoft.NET.Sdk/build/Microsoft.PackageDependencyResolution.targets(154,5): error : Assets file ‘/Users/username/Documents/PROJEKT/Solution1/WebApplication1/V:/Documents/PROJEKT/Solution1/WebApplication1/obj/project.assets.json’ not found. Run a NuGet package restore to generate this file. [/Users/username/Documents/PROJEKT/Solution1/WebApplication1/WebApplication1.csproj]
/var/folders/5l/1bssc0z152s_shv8j8nb9htm0000gn/T/.NETCoreApp,Version=v1.1.AssemblyAttributes.cs(4,20): error CS0400: The type or namespace name ‘System’ could not be found in the global namespace (are you missing an assembly reference?) [/Users/username/Documents/PROJEKT/Solution1/WebApplication1/WebApplication1.csproj]
Alas restore, publish and run.
> dotnet restore
Restoring packages for /Users/username/Documents/PROJEKT/Solution1/WebApplication1/WebApplication1.csproj…
Restore completed in 784.3 ms for /Users/username/Documents/PROJEKT/Solution1/WebApplication1/WebApplication1.csproj.
Generating MSBuild file /Users/username/Documents/PROJEKT/Solution1/WebApplication1/obj/WebApplication1.csproj.nuget.g.props.
Writing lock file to disk. Path: /Users/username/Documents/PROJEKT/Solution1/WebApplication1/obj/project.assets.json
Restore completed in 1.7 sec for /Users/username/Documents/PROJEKT/Solution1/WebApplication1/WebApplication1.csproj.
NuGet Config files used:
/Users/username/.nuget/NuGet/NuGet.Config
Feeds used:
https://api.nuget.org/v3/index.json
Why we need to restore it again is something I haven’t grokked yet. To be honest – if I hadn’t tricked you into, unnecessarily, restoring on the Windows machine first you wouldn’t have noticed.
> dotnet publish
Microsoft (R) Build Engine version 15.1.548.43366
Copyright (C) Microsoft Corporation. All rights reserved.
WebApplication1 -> /Users/username/Documents/PROJEKT/Solution1/WebApplication1/bin/Debug/netcoreapp1.1/WebApplication1.dll
> dotnet run
Hosting environment: Production
Content root path: /Users/username/Documents/PROJEKT/Solution1/WebApplication1
Now listening on: http://localhost:5000
Application started. Press Ctrl+C to shut down.
Open another console and curl:
> curl localhost:5000/api/values
to get the result:
[“value1″,”value2”]
You can of course open a web browser to do the same.
Don’t forget to stop the application if you want to continue as otherwise a file might get locked.
Start container
Install Docker on your mac unless you already have.
You can probably do whatever is described here on your Win10 machine with Docker for windows.
But I happen to have OSX and a virtualised Windows10 through Parallels. It is said to be possible to run Docker for windows in Parallels but then I have to fork out another 50€ (per year?) for the Pro version; and having a virtualised Windows to virtualise yet a machine creates a performance penalty also on the host OS. My machine is running warm and noisy as it is.
Start
> docker run -p80:80 -ti –rm -v /Users/username/Documents/PROJEKT/Solution1/WebApplication1/bin/Debug/netcoreapp1.1:/Web microsoft/aspnetcore /bin/bash -c ‘cd /Web/publish; dotnet WebApplication1.dll’
Hosting environment: Production
Content root path: /Web/publish
Now listening on: http://+:80
Application started. Press Ctrl+C to shut down.
Caveat: For almost a full day I got the error message docker: invalid reference format.
which was somehow related to microsoft/dotnet:1.1.2-runtime
which was wrong because when I rewrote the very same text it suddenly started. My first guess was that there was a hidden character somewhere but I rewinded to an earlier command that had failed and suddenly it worked.
If you care already now about the parameters for docker run they are:
-p80:80
I did not want to make this quick start unnecessary complex by having lots of different ports so everything is running on port 80.
With that said; as Kestrel (the web server we instantiated in Program.cs runs in aspnet it talks on port 80. Then we open a hole in the container from port 80 to port 80. This latter is what -p80:80 means.
-ti
This gives us a terminal, of sorts, and something about how it receives commands.
-rm
This one cleans up after our run so there is no halted container wasting hard drive space when the container stops.
-v /User….:/Web…
This parameter lets the continer use /Web to reach folder /User… where we have put our code.
microsoft/aspnetcore
This is the name of the image we use. An image is to a container what a class is to an object.
In this article we don’t adapt the microsoft/aspnetcore image, created by microsoft especially to run aspnet core solutions, to anything but use it as it is.
As we have not specified a version we get the latest.
Microsoft has many images for different uses.
/bin/bas…tion1.dll’
Execute a command in bash.
The command happens to be “start the web server”.
Call the web server in the container
Then open another terminal and curl:
> curl localhost:80/api/values
[“value1″,”value2”]
Yay! The web server in the container runs your dotnet core web application.
August 10th, 2017
If I ever get around to writing The bug management system (one that works as good as for instance Stack overflow) I hope to have the bugs classified as Bohrbugs, Heisenbugs, Mandelbugs and Schrödinbugs.
Praise where praise is due.
On a side note I don’t mean a bug should be categorised into one of the types above. It should, if applicable, be tagged with one or more.
This I say because I believe a bug is not a bug but a task. Everything is a task.
Then in my stupendous system I would not call it a task but something without meaning. “radish” “kopannkaka” “thigglymijig” “kuto” “item”
July 21st, 2017
These 5 files has served me for 10 years or more for updating a windows service in a small project I have.
The code is crude but serves its purpose. It is not hard to make the code nicer.
The thing here is that I have 1 service in 2 instances, one for production and one for QA on the same machine. Hence they need different names.
The bat file I normally run is StopUninstallInstallStartService.bat because it does the whole turn around. Between every step it pauses and allows me to check the output and between Uninstall and Install also swap the binaries.
I have a similar single file solution here.
InstallService.bat
1
2
3
4
5
6
7
8
9
10
11
12
13
14
| @echo off
rem This bat file installs a service and sets its name.
if dummy==dummy%1 (
goto help
)
rem *** Install the service.
sc create %1 binPath= %CD%\MyService.exe DisplayName= "MyService [%1]" start= delayed-auto
sc failure %1 reset= 0 actions= restart/30/restart/30/restart/3000
rem C:\Windows\Microsoft.NET\Framework\v4.0.30319\installutil.exe MyService.exe
goto end
: help
echo Parameter is missing.
echo Syntax: InstallService [Servicename]
:end |
StartService.bat
1
2
3
4
5
6
7
8
9
10
11
12
| @echo off
rem This bat file starts a service by its name.
if dummy==dummy%1 (
goto help
)
rem *** Start the service.
sc start %1
goto end
: help
echo Parameter is missing.
echo Syntax: StartService [Servicename]
:end |
StopService.bat
1
2
3
4
5
6
7
8
9
10
11
12
| @echo off
rem This bat file stops a service by its name.
if dummy==dummy%1 (
goto help
)
rem *** Stop the service.
sc stop %1
goto end
: help
echo Parameter is missing.
echo Syntax: StopService [Servicename]
:end |
UninstallService.bat
1
2
3
4
5
6
7
8
9
10
11
12
13
| @echo off
rem This file uninstalls a service by its name.
if dummy==dummy%1 (
goto help
)
rem *** Uninstall the service.
rem sc delete %1
C:\Windows\Microsoft.NET\Framework\v4.0.30319\installutil.exe /uninstall MyService.exe
goto end
: help
echo Parameter is missing.
echo Syntax: UninstallService [Servicename]
:end |
StopUninstallInstallStartService.bat
1
2
3
4
5
6
7
8
9
10
11
12
13
14
15
16
17
18
19
20
21
22
| @echo off
rem This file stops, uninstalls, installs and starts a service; with a pause in between for manual intervention.
if dummy==dummy%1 (
goto help
)
echo *** Stop the service
call StopService %1
pause
echo *** Uninstall the service.
call DeleteService %1
pause
echo *** Install the service.
call InstallService %1
pause
echo *** Start the service.
call StartService %1
pause
goto end
:help
echo Parameter is missing.
echo Syntax: StopUninstallInstallStartService [Servicename]
:end |
July 19th, 2017
I have one bat file that does all this for me.
It also has a pause inserted so I can visually check that everything looks ok.
The pause between uninstall and install is important as that is where I exchange the DLL when updating.
Yes, the code is ugly. But it has served a project for 10+ years with the only update with new dotnet versions.
I have a similar solution here. It uses several files but can also name the service.
1
2
3
4
5
6
7
8
9
10
11
12
13
14
15
16
17
18
19
20
21
22
23
| rem *** Stop the service.
net stop "My Service Name"
pause
rem *** Uninstall the service.
C:\Windows\Microsoft.NET\Framework\v4.0.30319\installutil.exe /uninstall MyService.exe
pause
rem *** Install the service.
C:\Windows\Microsoft.NET\Framework\v4.0.30319\installutil.exe MyService.exe
pause
rem *** Start the service.
net start "My Service Name"
pause |
July 7th, 2017
I seldom use F5 (start the application in debugging mode in Visual studio) but instead run it normally and connect the debugger only when I need to.
Connecting the debugger takes a measurable amount of time so with a faster turnaround I can keep focused better.
I also leave IIS running all the time. It does shadow copying so there is no need to restart anything.
I have recently switched from IIS to IIS express while developing and hence need to have it running all the time. That I do through the command prompt with
1
| "c:\Program Files\IIS Express\iisexpress.exe" /path:C:\PathToMyWeb /port:32767 |
where path is the path to the site (where the web.config resides) and the port is what you see in the web project properties or in the web browers’s address bar the first time you hit F5.
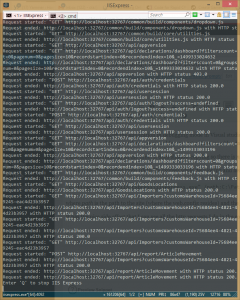
It has the nice side effect that I can see all the http requests I do in the command window, a light weight current log of sorts.
